Buttons
This tutorial will walk you through the process of adding buttons to your messages and then responding to user interactions.
Creating Buttons
Buttons are arranged in a grid just below a message. Each row of the grid is allowed to contain up to 5 buttons, and there can be a total of 5 rows per message (both are Discord limitations).
type Button
A button is created by using the Button type and setting the different fields which determine how the button ends up looking. Here is a breakdown of each of its fields:
.Label
This is the text that appears on the button and is visible to the user. It can be a maximum of 80 characters and the length of the string has an influence on the length of the button.
.Style
This sets both the graphical look of the button as well as its function. By default Discord will forward button clicks back to the bot in order for it to respond to the interaction. However, buttons with a style of LinkButton are meant to redirect the user to a website. If a user clicks this type of button, it will not be forwarded to the bot.
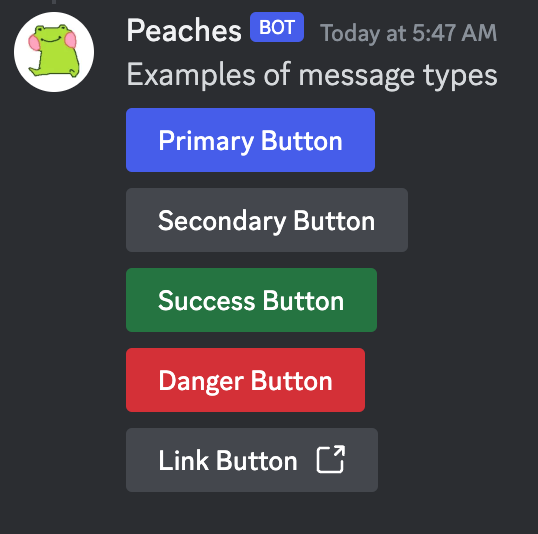
Here is an example of each of the 5 available styles:

.Disabled
Defaults to false and determines whether or not the button is clickable. If set to true, the button will appear greyed out and the user will be unable to click it.
.URL
When using a LinkButton style, this needs to be set to a valid web URL. This is mutually exclusive with CustomID and trying to set both will result in your code crashing.
.CustomID
This does not influence the look or function of the button. It is a unique string supplied by the programmer as a way to internally identify which button is pressed. It can be up to 100 characters in length.
This is mutually exclusive with URL and trying to set both will result in your code crashing.
.Emoji
This will be discussed later in this tutorial. It allows you to specify an emoji to use which will cause Discord to place the emoji next to the button label.
type MessageComplex
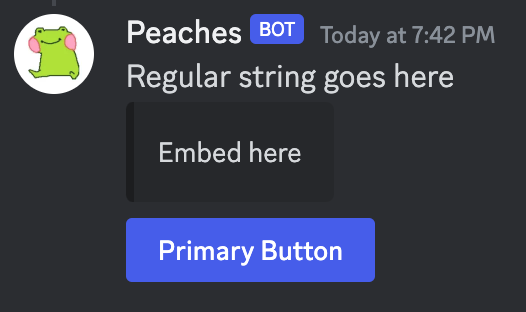
In order to attach buttons to a message, you need to use a MessageComplex type. The main thing to know about this is that it allows you to mix regular text, embeds, and message components (e.g. buttons) all into the same message. Here is an example using all 3:
{{$msg := MessageComplex
    Content: "Regular string goes here"
    Embeds: (Array (Embed
        Description: "Embed here"
    ))
    Components: (Array (Button
        Label: "Primary Button"
        Style: PrimaryButton
        CustomID: "Button01"
    ))
}}
{{respond $msg}}
Here what it looks like when running the code:

Handling Interactions (Button Pressed)
If you run the code from above and then click on the button, you’ll notice the following message appear in the Discord client:

The reason for this is that we need some sort of code that will handle the button press. Right now what’s happening is that Discord sends the button press event to the bot, it checks and sees the guild has no trigger for that event type, and then it throws the event away. This results in Discord not receiving any response back, so it reports back to the user that the interaction failed. This is where the Message component interaction trigger comes into play.
With this trigger, you can write code that acts on context.Interaction which is populated by the bot with information about the user interface event. You can create a new trigger with /create-trigger called “button pressed” and give it a type of Message component interaction. Then you can paste the following code into the text box:
{{$clickedMessage := context.Message}}
// Message component interaction events have a new entry in context to work with
{{$data := context.Interaction}}

// Check to see if the custom id matches "Button01" from above
{{if eq $data.CustomID "Button01"}}
    {{respondPrivate (print
        "You clicked on " $data.CustomID
        " on message " $clickedMessage.ID
        " of type " $data.ComponentType
    )}}
{{end}}
Now when you click on the button you’ll see something like this:

This code also demonstrates the importance of the CustomID field. It allows you to write triggers that conditionally perform certain actions based on which button ID is returned, and ignore IDs that it doesn’t recognize or that don’t follow the right pattern it’s looking for.
Adding Emojis
Adding an emoji next to the label of the button is done using the Emoji field and giving it an EmojiComponent object. The EmojiComponent object contains three fields: Name, ID, and Animated. For builtin emojis, Name can just be a string with the emoji inside of it. For emojis that are custom to your server, you can provide the name of it inside of Name and then its Discord ID inside of ID.
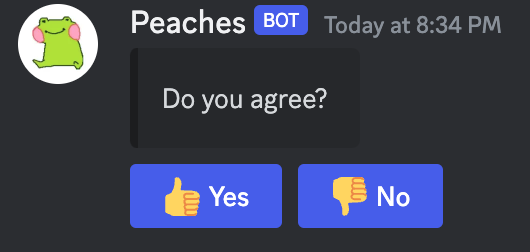
Here’s an example of creating an Agree/Disagree button menu using the thumbsup/thumbsdown emojis.
{{$agree := Button
    Label: "Yes"
    Style: PrimaryButton
    CustomID: "Button01_Agree"
    Emoji: (EmojiComponent
        Name: "👍"
    )
}}

{{$disagree := Button
    Label: "No"
    Style: PrimaryButton
    CustomID: "Button02_Disagree"
    Emoji: (EmojiComponent
        Name: "👎"
    )
}}

{{$buttons := Array $agree $disagree}}

{{$msg := MessageComplex
    Embeds: (Array (Embed
        Description: "Do you agree?"
    ))
    // wrap $buttons in another array so that
    // the two buttons appear on the same line (row)
    Components: (Array $buttons)
}}

{{respond $msg}}
Here is what that ends up looking like:

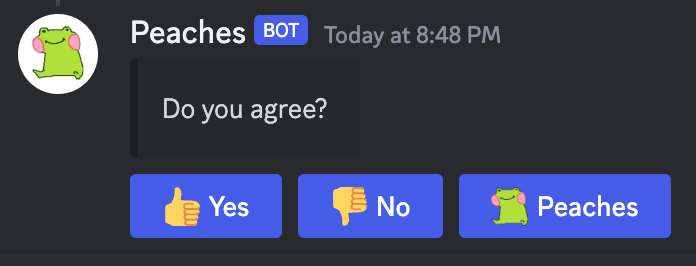
We can extend the code above with a 3rd button that uses a custom server emoji. This will make use of the ID field of emoji component. To get the ID of an emoji in your server, you can enter the emoji into the Discord chat box and then add a backslash \ before it. This will print the name:id combination into the chat.
...

{{$peaches := Button
    Label: "Peaches"
    Style: PrimaryButton
    CustomID: "Button03_Peaches"
    Emoji: (EmojiComponent
        Name: "peaches"
        ID: 1207016981354778676
    )
}}

{{$buttons := Array $agree $disagree $peaches}}

...
Here’s what it looks like now with the 3rd button added:

Example: color role selection
This example will create a color role selector button menu. If they pick a new color role while already having an existing color role, it will remove their existing color role and then give them the new color role. If a user selects the same role that they have, it will remove it and not give them any new role.
Here is the code that creates the color menu. Notice that CustomID is being set to use a “RoleIndex_” pattern. This will be important in the trigger code further down.
{{$red := Button
    Label: "Red"
    Style: PrimaryButton
    CustomID: "RoleIndex_0"
    Emoji: (EmojiComponent
        Name: "🔴"
    )
}}

{{$green := Button
    Label: "Green"
    Style: PrimaryButton
    CustomID: "RoleIndex_1"
    Emoji: (EmojiComponent
        Name: "🟢"
    )
}}

{{$blue := Button
    Label: "Blue"
    Style: PrimaryButton
    CustomID: "RoleIndex_2"
    Emoji: (EmojiComponent
        Name: "🔵"
    )
}}

{{$buttons := Array $red $green $blue}}

{{$msg := MessageComplex
    Embeds: (Array (Embed
        Title: "Color Roles"
        Description: "Select your favorite color!"
    ))
    // wrap $buttons in another array so that
    // the three buttons appear on the same line (row)
    Components: (Array $buttons)
}}

{{respond $msg}}
Now here’s the trigger code that handles the message component interaction events. It makes use of the database to quickly query the existing role ID of a user (if they have one), and then storing their new role ID.
{{$roleIds := Array
    1207539118356045824 // red - replace with your own ID
    1206492832936886332 // green - replace with your own ID
    1206492862775304222 // blue - replace with your own ID
}}

{{$user := context.Member.User}}
{{$data := context.Interaction}}

// Make sure the button click is related to the role selection menu
{{if prefix $data.CustomID "RoleIndex_"}}
    // Use split to break the string into ["RoleIndex", "%"]
    // then we can use the second element as the array index
    {{$items := split $data.CustomID "_"}}
    {{$index := toInt64 (index $items 1)}}
    {{$newRole := index $roleIds $index}}

    // Check the database
    {{$entry := dbGet $user.ID "ExistingColorRole"}}
    {{$existingRole := 0}}
    {{if $entry}}
        {{$existingRole = toInt64 $entry.Value}}
    {{end}}

    {{if eq $existingRole $newRole}}
        {{dbDel $user.ID "ExistingColorRole"}}
        {{respondPrivate "Removed the role"}}
        {{takeRole $user.ID $existingRole}}
    {{else}}
        // store as string since DB converts ID to float
        {{dbSet $user.ID "ExistingColorRole" (toString $newRole)}}
        {{respondPrivate "Gave you the role"}}

        // remove existing, give new
        {{takeRole $user.ID $existingRole}}
        {{giveRole $user.ID $newRole}}
    {{end}}
{{end}}